ARC Raiders How to Kill Bastion: Weak Points, Weapons & Solo Strategy
The Bastion is a walking fortress with a rotary cannon that shreds raiders in seconds. Here is exactly how to take one down, which weapons work best, where to find them, and what loot you get for the trouble.
How to Kill Bastion in ARC Raiders
Weak spots, best weapons, spawn locations, and Bastion Cell farming.
Key Takeaways
- Never shoot the front. Target the yellow rear canister and leg joints for actual damage.
- The screech means move. One second warning before a three-second gatling burst. Get to cover.
- Deadline Mines one-shot it. Drop onto the Bastion from above and plant a mine for an instant kill.
- 6 Bastion Cells upgrade the Gear Bench to Level III. Each kill drops 3-7 cells.
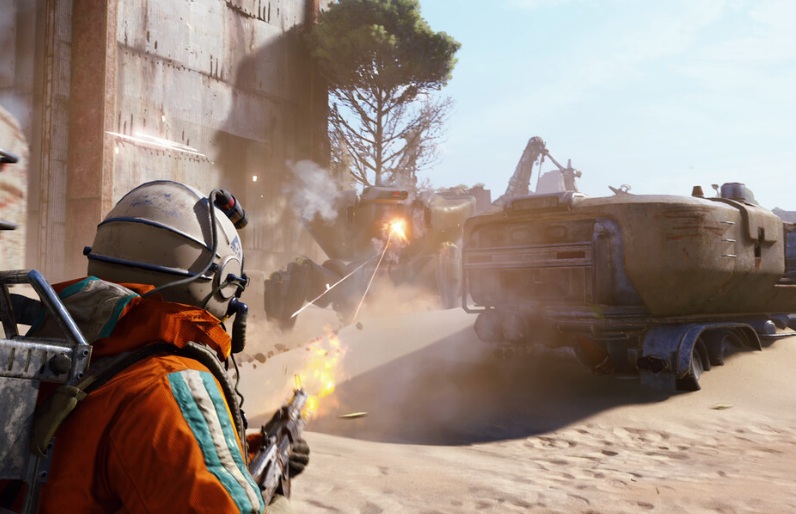
Killing a Bastion in ARC Raiders comes down to positioning. This Extreme-threat ARC machine carries a high-caliber rotary cannon that will shred you in seconds if you fight it head-on. The front armor absorbs almost everything you throw at it. Instead, you need to circle behind it, target specific weak points, and use the gaps between its gatling bursts to deal damage. Here's how.
Bastion Weak Points
| Weak Point | Location | Damage | Effect |
|---|---|---|---|
| Rear Yellow Canister | Back, lower section | Maximum | Destroying it exposes an internal barrel that takes even more damage |
| Yellow Leg Joints | Four joints per leg | High | Breaks off armor and briefly stuns the Bastion |
| Minigun Barrel | Top-mounted cannon | Moderate (cooldown only) | Small window when overheated |
| Front/Side Armor | Main body | Near zero | Don't waste ammo here |
Your primary target is always the rear yellow canister. Destroy it and a larger internal component gets exposed underneath that takes massive damage per hit. Destroying leg joints is secondary but useful because each broken joint stuns the Bastion, giving you time to reposition or land more shots on the back.
Best Weapons
Costs 15,000 coins from Apollo's shop. Climb above the Bastion, drop onto its back, plant one or two mines. Instant kill. The Bastion can't target you while you're standing on top of it. This is the go-to method for solo players and the most reliable way to farm.
Available from traders for 30,000 coins. Purpose-built for ARC machine combat using Heavy Ammo. Devastating per-shot damage when hitting weak points. If you prefer fighting from cover at distance, this is your weapon. See our tier list for how it ranks against other heavy options.
Consistent damage at range, but you must crouch while firing. Standing causes severe bullet spread. Crouched, the Torrente hits tight enough to reliably land shots on the rear canister for 1,300-2,200 damage per burst.
Stack 6-7 Trigger'nades and throw them during the pause between gatling bursts. Blaze Nades and Wolfpacks work as alternatives. Throw when the Bastion pauses to recalibrate after each burst.
Kill Strategy
The Core Loop
1. Clear the area. Kill nearby Wasps, Hornets, and smaller ARCs first. Stray enemies pulling aggro mid-fight turns a manageable encounter into a death spiral.
2. Find cover with multiple exits. Shipping containers, buildings with two doors, or rocket parts work well. The Bastion circles your position while firing, so you need room to rotate.
3. Listen, hide, shoot, repeat. The mechanical screech gives you one second to break line of sight. Wait out the three-second burst, then use the 2-3 second pause to dump damage into the rear canister or leg joints. Get back to cover before the next cycle.
4. Break leg joints for stuns. Each broken joint staggers the Bastion briefly, creating extra windows to reposition or land more shots on the back.
Solo: Use Deadline Mines from above whenever possible. No mines? Use enclosed cover with small openings. The Bastion shoots through gaps, so large windows and doorways will get you killed. Patient damage, no risky plays.
Squads: Triangular positioning. One player draws aggro from the front, two flank the rear canister. When the Bastion turns toward a flanker, the other flanker becomes the damage dealer. Keep rotating. One player can also stun with grenades while another climbs on top to plant explosives. Coordinate your skills around stun-and-damage loops.
Spawn Locations
| Map | Locations | Notes |
|---|---|---|
| Stella Montis | Lower Loading Bay (central) | Guaranteed spawn. Best farming spot. Shoot from upper levels. |
| Blue Gate | Headhouse tunnels, Outer Gates, Maintenance Bunker | Tunnels give natural high ground for mine drops |
| Spaceport | Rocket Assembly, Vehicle Maintenance, West/East Hangars, Launch Towers | Rooftop positions at Rocket Assembly |
| Buried City | Hospital street, Piazza Arbusto, Town Hall | Open areas. Bring ranged weapons. |
| Dam Battleground | North of Hydroponic Dome, Left of Testing Annex | Check both locations each raid |
Loot and Bastion Cells
Each Bastion drops 3-7 Bastion Cells plus ARC Alloy, ARC Powercell, ARC Motion Core, ARC Circuitry, and Mechanical Components. You earn 500-600 XP per scavenge.
You need exactly 6 Bastion Cells to upgrade the Gear Bench to Level III, unlocking Mark 3 shields. That's a major survivability jump for endgame content. After the upgrade, each surplus cell sells for 5,000 credits at traders, making Bastion farming one of the most profitable loops in the game. Two kills can net 30,000-70,000 credits in cells alone. Check our blueprints guide for crafting recipes that use the other materials.
Compare Loadouts for Bastion Runs
Find the right weapon combo for your farming setup.
Compare WeaponsFrequently Asked Questions
Can I kill a Bastion solo?
Yes. Deadline Mines from an elevated position are the safest solo method, killing it in one shot. Without mines, use the Hullcracker or Torrente (crouched) and cycle between cover and damage windows after each gatling burst.
Where is the guaranteed Bastion spawn?
The lower Loading Bay in central Stella Montis spawns a Bastion every raid. You can attack from the upper levels where the Bastion struggles to return fire, making it the best farming location.
How many Bastion Cells do I need?
6 cells for the Gear Bench Level III upgrade. Each kill drops 3-7 cells, so you might get it in one kill or need two. After upgrading, surplus cells sell for 5,000 credits each.
What audio cues does the Bastion have?
A distinctive mechanical screech roughly one second before each gatling burst. When you hear it, stop shooting and get behind cover. The burst lasts three seconds, then you get a 2-3 second window to deal damage.